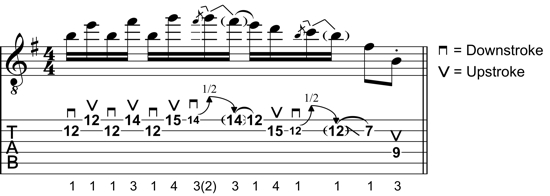
Welcome to the second lesson of the Rock Licks Booster course. In this lesson we’re going to look at a lick that uses pivoting. (Don’t panic if you haven’t heard this term before, because I’m going to explain it in a minute).
Like the first lick, I’m going to keep this lick in the key of E. But this time we’re going to use the E Natural Minor scale to create the lick. This scale is also called the Aeolian mode, or the Pure Minor scale, and is constructed from the following notes…
E Natural Minor Scale:

It would be a really good idea to memorise this table, if you don’t already know the notes of this scale. I wouldn’t want to guess how many rock guitar licks and solos uses this scale, so it definitely won’t be a waste of time getting to know the notes of it inside out. 🙂
OK, enough of the theory stuff. Let’s check out the lick…
Rock Guitar Lick 2: Natural Minor Pivoting Lick

If you have your guitar handy, please play through the notes of the lick slowly a few times. Now, here’s a question for you. What do you think I mean by the term pivoting?
If you look closely at the first six notes of the lick, notice how we’re doing the following…
- Playing the note B.
- Playing the note E.
- Playing the note B.
- Playing the note F#.
- Playing the note B.
- Playing the note G.
So what we’re doing is continually going back to the B note. In other words, we’re using the note B as a pivot point in our melodic idea.
This melodic device is often associated with Neoclassical metal guitar players like Yngwie Malmsteen. But it can definitely be used in a more straight-ahead rock style, as long as you don’t overdo it, and you also make sure to steer clear of the Harmonic Minor scale.
Important Points
There are a few things you need to pay attention to when you practice the lick…
- Watch out for the finger-roll. The first three notes of the lick are played with the first finger using a technique called finger-rolling. If you’re not comfortable with this technique, then it’s vital that you watch the video.
- Pay attention to the bends-and-releases. The two bends-and-releases in this lick both use half-step bends. It’s really easy to overshoot these small bends, so I recommend doing some isolated practice on them to make sure that you only bend a half-step and no further.
- Try not to tense your shoulder when doing the slide. If you look at the TAB now, you’ll notice that you need to slide from the 12th fret to the 7th fret in order to articulate the second-to-last note. It’s really common for guitarists to tense their should when doing large slides like this. Watch out for this as you do the slide, and try to keep your shoulder as relaxed as possible.
- Don’t get hung up on the demonstration speeds. On the video I play the lick at 50 bpm and 100 bpm. These are the tempos that I decided to use for the video, but are not necessarily the speeds you should aim for. Choose a target speed that is challenging for you at your current level of playing. This might mean aiming for a much slower speed. It could also mean that the 100 bpm is going to be not challenging enough.
Hope you had fun with the lick. See you next time. 🙂
Return To: Rock Guitar Licks