In this guitar lesson we’re going to look at some very useful ways of playing triad arpeggios on the guitar. In my opinion, the fingerings we’ll cover in this lesson are essential, and they will help you to build a strong foundation that will enable you to learn and master more advanced arpeggios. But before we look at the arpeggio fingerings, we should quickly cover some important theory.
A Little Bit Of Theory
If you haven’t heard the term arpeggio before, then you’ll be pleased to know that all it means is the notes of a chord played one at a time. I like to think of an arpeggio as a way of using the chord notes like a scale. Don’t panic if this isn’t totally clear yet. It will make total sense when we look at a few examples later on.
So what are triads? Well, the term triads is just a fancy name for chords that contain three notes. This is an incredibly simplistic definition, but it will do for now. All you need to know for this lesson is that a triad is constructed from three different notes, and that there are four main types of triads…
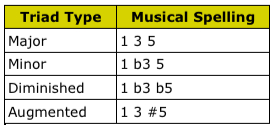
If you’ve worked through the theory lessons on my website, then you should have a pretty good idea of how to use these musical spellings. But we should go through an example now. To do that let’s work out all of these triads using C as the root note for each chord…
Example: Working Out all Triads With C as the Root Note
Step 1: Write down the C Major scale
The first thing you need to do to work out any triad, is to write down the major scale that has the same root note as the triad you want to work out. For our example, that means writing down the C Major scale…

Step 2: Work out the notes of the C Major triad.
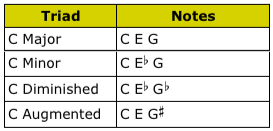
We know from earlier that the musical spelling for a major triad is 1 3 5. This means that to construct a C Major triad, we would take the 1, 3 and 5 from the C Major scale. This gives us these notes…

Step 3: Create the rest of the triads by altering the C Major Triad
What we now do is alter one or more of the notes of the C Major triad to create the new triads. Let’s go through them one at a time…
Minor Triad: Flatten the 3
Because the musical spelling of a minor triad is 1, b3 and 5, that means that the notes of the C Minor triad are…

Diminished Triad: Flatten the 3 and 5
To create the diminished triad we need to flatten both the 3 and the 5. This means that the notes of the C Diminished triad are…

Augmented Triad: Sharpen the 5
Let’s now create the final triad by sharpening the 5 of the C Major triad. This would mean that the C Augmented triad has these notes…

Here’s a table summarizing these four triads…
Some Useful Triad Arpeggio Fingerings
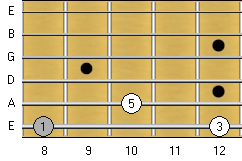
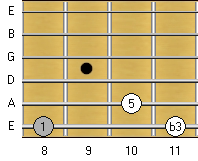
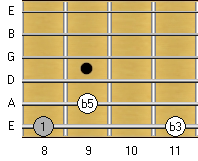
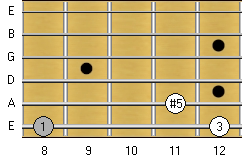
Now that we’ve covered the necessary theory, let’s now look at some useful fingerings for the four different types of triads. I like to call them 2-1 Fingerings because we’re playing two notes of the triad on the lower-sounding string, and one note of the triad on the higher-sounding string…
C Major Triad: 2-1 Fingering
C Minor Triad: 2-1 Fingering
C Diminished Triad: 2-1 Fingering
C Augmented Triad: 2-1 Fingering
Please take a few minutes to check out these fingerings. Pay close attention to the similarities and differences between the four triad types. Once you’ve done that, then you’re ready for the exercise below…
An Incredibly Useful Exercise
What we’re going to look at now is a really good exercise for memorizing the fingerings. It will help you to internalize the following four things…
- The overall shape of each arpeggio fingering.
- The musical spelling of each triad type.
- The sound of each triad.
- The location of each chord tone within the fingering.
Although the exercise is really simple to do, and you might be tempted to skip it, please don’t underestimate the value of doing it. This exercise will help your fretboard knowledge a lot. It’s also worth mentioning here that the same practicing process we’ll use now can be used to memorize ANY arpeggio fingering. Becoming comfortable with the process now will really help with your arpeggio studies in the future.
Now that I’ve sold you on the idea of practicing the exercise 🙂 ,let’s check it out…
Triad Memorization Exercise 1: Practice For 5-Minutes
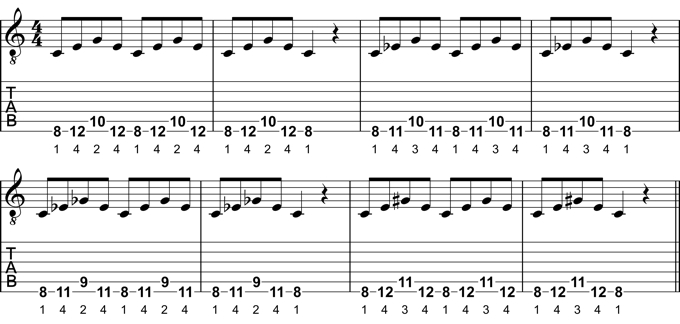
Although it’s best to learn how to do this exercise by watching the video below, it’s definitely worthwhile to go through some important practice tips now…
- Before you play each triad, say the name of the triad out aloud. For Example: Before you play the very first note of the exercise you should say “C Major” out aloud.
- As you play each note, say the chord tone out aloud. For Example: When you play the first note of the exercise, you would say “One” out aloud. When you play the second note of the exercise, you would need to say “Three” out aloud.
- The exercise is meant to be practiced very slowly, and it’s not meant to be played in time. Take as long as you need to play each note of the exercise. It’s a fretboard knowledge exercise—not a technical exercise.
- Practice the exercise for five minutes at least three times a week. Continue doing this every week until you think there’s no way you could ever forget the fingerings. If you practice them, only to forget them later on, then you have truly wasted your time. So stick with the exercise until you know the fingerings inside out. 🙂
A Few Last Words
Because arpeggios are a really useful tool to have in your guitar soloing toolbox, I hope you make the time to work on the exercise. For extra brownie points, you could also do the following things…
>> Work out how to move the arpeggio fingerings to other string pairs. In this lesson we focused on the thick E-string and A-string, but you could also play the same triads on the…
- A-string and D-string.
- D-string and G-string.
- G-string and B-string.
- B-string and thin E-string.
>> Work out different fingering strategies for the same triads. This would mean working out…
- 1-2 Fingerings. (This is when you play one note of the triad on the lower-sounding string, and two notes of the triad on the higher-sounding string).
- 1-1-1 Fingerings. (This is when you play each note of the triad on a different string. For Example: You could play one note on the thick E-string, one note on the A-string, and one note on the D-string).
Don’t panic if you get stuck working these out. I’ll be covering both of these in the next lesson. But it would be a great idea to start working them out for yourself. Experimenting, and trying to work things out, is a fantastic way of learning.
Have fun with this stuff!
Return To: Guitar Fretboard Knowledge Lessons
